Showing posts with label hallway. Show all posts

Saturday, November 5, 2011

Staircase Progress

Progress has been veeeeeerrryy slooooow on the staircase. At this rate I will be happy to be done with this project by Christmas - which is actually happening pretty soon...

Since stain takes a WHILE to dry (like a couple of days?) I decided to experiment and do the left half of the staircase first, so we could walk on the right side:


I was a little nervous that the middle area would look funny, but it's actually fine:


The only thing I'm a little worried about are the areas where the old polyurethane didn't lift off in the sanding stage. You can see the stripey lines in this photo:


It's ok, but not perfect. I might put another coat of stain over some of these lighter areas. By the way, the flash on this camera is more lighting than this staircase ever sees under normal conditions. So this is really the worst view possible.

I am kind of at a standstill with this project since we haven't had a chance to run to the store to get a fresh can of poly, and MY BACK IS KILLING ME! For realsies. The past few weeks of bending over the staircase might or might not be the culprit. Either way, I'm taking a break from the stairs for a bit!

Friday, October 21, 2011

Stairs update!

Last spring I removed the carpet on the steps. It was pretty cruddy underneath and we've been living with it like this for, like, ever:


Funny story - the guys who refinished our floor way back like almost two years ago were like "We can refinish the staircase for $300" and I was like "Ummmmmm.... well... no, i don't know what we're doing" and they were like "Are you sure?" and I was like "Yes, I'm just not sure if we're going to replace the carpet or what we're doing, so I'll wait til later to make a decision" and they were like "ARE YOU SURE???"

Lesson learned - just get the stairs refinished next time!

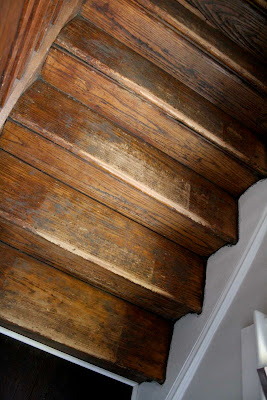
So this week I sanded it myself. First with 60 grit, which was really slow going. Then I upped it to 50 grit, which did help a lot. Smoothed it over with 60 and 120 and we're ready to stain:


There are still little dents and dark spots and places where old grime didn't lift up, but seriously, after 6 hours of mind-numbing labor I just don't care.


You can see the remains of a runner from years back. Also, you can't see from this angle, but a lot of the front parts of the steps are worn down and a little busted. 

My plan is to stain the treads dark to match the floors and if we can still see these lines, or if we are not satisfied with the outcome, we'll add a runner.  

The risers will be painted white and I see lots of touching-up in my future!

To date this is the most "outside my comfort zone" project I've taken on. Crossing my fingers this will work!


Thursday, September 15, 2011

Upstairs hall bathroom closet

One of the things gnawing at my OCD for a long time was our bathroom hall closet. It came to a head after last week, when I was spending way too much time digging around for everyday basics like dental floss and deodorant, and coming up with empty bottles of Listerine and hand soap. 


So, after a thorough cleaning and dumping...


Yes, I have striven and dreamt about this all my life - baskets that match, and a closet that rivals those in the Pottery Barn catalog. Sort of.


I'm hoping to someday replace the shelving, and patch and paint the inside of the walls. But really, that's a project for Spring 2017. Too many other things in the works!

Wednesday, April 20, 2011

If ever there was a case for painting the woodwork...


Ta-da!

Seriously. This place is starting to look like something.

Just to remind you where we came from:
before

before

We still need to finish the stairs...

This was really tedious to paint...


Because of its placement at the middle the house, both the living room and staircase have a tendency to stay dark all day. Painting the woodwork really brightened the whole room:

Side note: I really like that, even though there is still work to be done on the stairs, they aren't visible when I'm lounging on the couch - and that speaks volumes to my OCD. Now for a new lamp, new console table, new rug, new couch...

Thursday, April 7, 2011

Tedium

I've been slooowly working on the banister and spindles.

The banister needed a lot of patching and sanding. Followed by staining and polyurethan-ing (sp?). It looks very neat and clean and finished now. So it is done. Forever.

But the spindles. Oh the spindles!
I am halfway done with the them. Working very carefully to make perfectly straight lines where the banister and spindles meet.

I took this photo while doing the first coat:
Starting from the bottom --> up

The thing is, it's looking really awesome. The decision to paint everything BUT the banister was the right one. So it is worth the short-term tedium.

More photos coming soon!

Wednesday, March 9, 2011

Point of no return

After many, many, many months of consideration...

(this would be the point of no return)


This photo is real, un-photoshopped


The picture is mildly deceiving. There are still quite a few steps left in the process. The entire face of the wall is done. But all of the posts need more coats of paint. And the banister still needs to be patched, sanded, stained, and polyurethaned. Then I need to work on the steps themselves, or hire someone else to deal with them.

It is kind of a relief to be this far along, because it's something I have gotten a little obsessive about (as the staircase is visible from the couch, and my eye always rests on things that bother me). I did want to finish completely before posting photos, but I became anxious.

Dad, I'm sorry for disrespecting the wood.

Monday, February 28, 2011

Decision time

I've been stalling the refinishing/painting of the staircase for three reasons:
1) indecision
2) laziness
3) financial hemorrhaging

So after numerous Photoshop attempts I've fixed problem number 1. We made a decision!

The above is obviously another Photoshop mock-up. This is what it will look like when finished - everything painted white except the banister and the treads.

At first I was a little hesitant about painting the post white. Funny our laziness as noted above actually helped the process. We noticed this same look in the Modern Family house as we were lounging catching up on our DVR on Sunday:


To be continued...

Monday, February 21, 2011

One more thing...

Yesterday I forgot (and Mom reminded me about) one more option for the stairs... Option E would be each step covered with sisal. I'm still leaning towards C.

Please tell me what to do :)

Sunday, February 20, 2011

don't stair at me

Yesterday we tackled the staircase carpet. I just couldn't take it any longer. This was underneath:
yeah

Then about 2 hours of taking out all the staples and trying to clean the wood underneath:
This is as good at it is going to get. For now.

Are we ready to live with this while we decide what we are doing?
In the meantime we gave ourselves strict instructions to use slippers or shoes when traversing this thing. There may or may not be scary splintering wood sticking out all directions.

What should we do? As previously discussed many many times on this blog, the banister and woodwork will be painted white. But the rest??

Choice A - Refinish wood to match rest of house, add sisal runner:

Choice B: Refinish treads only, paint risers white:

Choice C: Refinish treads only, paint risers white, add sisal runner:

Choice D: Paint risers and treads white, add sisal runner:

And all the choices together:
A B C D

I'm leaning towards choice C, but not totally convinced. John really likes A. What do you think?

Tuesday, February 15, 2011

Staircase Walls

Remember this mess? Well, it's done!

I will spare you the grisly before photos (if you're really curious you can click the above link).

Here is what it looks like now:


We are so happy that we finally did this! (Or paid someone to do this!). I am all for taking the DIY route when I can - but this was clearly a case for the professionals.

Next up:

Most people viewing this will fall into one of two camps:
1) Burn the gosh ugly rug and paint the freaking wood paneling and banister already.
2) Burn the gosh ugly rug and don't let me see a paint brush in your hand!

Sorry, but it's gonna be number 1! Soon!

Thursday, February 3, 2011

Secret Door!

If you are especially observant you might have noticed in my last post that there is a door built into the paneling of our staircase wall:
We have lived here for over a year now, and we have never opened this door. I thought for a while that it was nailed shut, then realized that it was locked. With a skeleton key lock. Despite owning a set of skeleton keys from our house, none of them worked in the lock.

The other side of the door faces a corner of the kitchen. I tried unlocking/picking the lock from both sides but it wasn't budging and I lost interest.

To be perfectly honest, I thought that one day we would get the door open and reveal a secret porthole to Narnia, or John Malkovitch's mind.

But... our contractor got the door open! I have no idea what he did, but it's working now! John was so psyched when we got home from work tonight - he couldn't wait to demonstrate walking through the door.
Opening the door did not reveal the Narnian realm I thought it would!

I find that I can't stand having parts of the house broken and not working. So this is especially satisfying.

I'm not sure we will use the door, but I'm glad we have the option.

I asked John what he thought of all this door nonsense, and I quote verbatim:
"I think, it's like - a wall has opened, it's like - a wall that moved. A wall - that it's basically like a - it's a, like a secret passage! Uh, a not-so-secret passage!"

Upon further questioning, John had a much more eloquent thought:
"This is a door that could have been closed for a decade, maybe more. There is no way of knowing if this door has ever been opened."

Awesome!

Tuesday, February 1, 2011

Nitty Gritty

One of the longest-lasting construction (or deconstruction) eyesores in our house is the stairwell. It contains so many layers of ugliness. Blah!!

Let's start with what we had when we bought the house:
Woodwork: charming (dingy)
Wallpaper: mediocre
Rug: Gross, yet simultaneously comfortable
Ceiling: cracked


---

2 days through 3 months after buying the house:


Woodwork: still charming (dingy)
Wallpaper: partly stripped where we could reach.
Rug: Still gross, still forest green circa 1986
Ceiling: cracked, also cracks behind the wallpaper! Woohoo for awesome discoveries!


---

Now:

Woodwork: half painted, half wonky
Wallpaper: totally wonky
Rug: Still wonky
Ceiling and walls: Wonky McWonkerstein

So we are crossing our fingers that our contractor will show tomorrow and by the weekend we will have eliminated at least the annoying parts we can't physically reach (without risking life and limb) (I'm being overdramatic - but really, let's be serious and admit that neither of us is getting up on a ladder in a stairwell).

---

Here is my latest inspiration photo:
How funny that the situation above is almost identical to our home? The direction of the photo, the location of front door with light shining in, the ornate wood mirror facing the bottom step, neutral paint on the wall, the desire for white woodwork/paneling alongside the staircase. It all points towards awesome goodness, if you ask me!

Photos to follow soon (hopefully!!)

Thursday, October 21, 2010

Kiss my brass

The doorknob and mail slot was rusty and brassy. Two bad things! Anyway to remind you, here is what it looked like before:

We removed all the offending pieces:
(Side note: 1 year ago today I could not fathom removing doorknobs and locks and putting them back in place. In fact this image would have stressed me out, but now this doesn't even phase me)

So to get back to the task at hand, my mother waved her magic wand, and we transformed the hardware to this:

We used those small acrylic craft paints you can get at any craft store. First we painted them metallic copper (which makes the metal look crazy and will get you a raised eyebrow from your husband) then we put a layer or two of dark brown paint on top of that. The copper shines through underneath and just leave a faint metal look, you see?

The key, we realized was to douse it all with spray polyurethene in satin finish. This protects the paint from wearing away, as well as gives all the pieces a nice even sheen.

(Side note: when I say "we" I really mean "mom". The woman knows her way around a craft project and a hardware store!)

It is a small project. But getting rid of that dirty old brass made a huge difference, even if I am the only one who notices: